

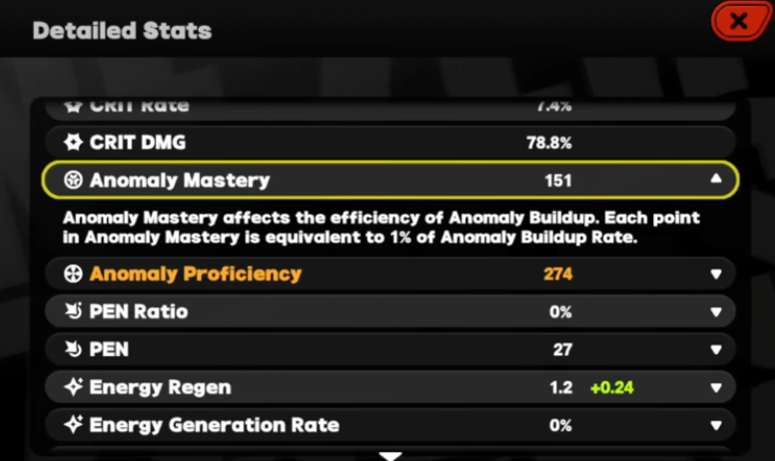
What is Anomaly Mastery in ZZZ?
Anomaly Mastery is a critical core attribute for anomaly-based agents in ZZZ, directly determining the damage ceiling, control effectiveness of abnormal statuses, and follow-up reaction damage—its synergy with Anomaly Buildup is key to optimizing team performance.
As a core attribute focused on enhancing abnormal status damage and duration, it is particularly essential for anomaly-focused agents and squads. Specifically, Anomaly Mastery impacts:
Duration and control strength of abnormal effects
Follow-up damage from anomaly reactions (e.g., Aftershock)
Anomaly Mastery is the core of ZZZ’s anomaly system—and think of the “anomaly value buildup process” as how you unlock its full potential (they’re not separate stats, but two sides of the same coin):
Mastery speeds up the buildup and boosts the reliability of the active status, then amplifies its damage, duration, and secondary effects (e.g., Aftershock). Neither works well alone—fast buildup needs Mastery to shine, and Mastery needs buildup to deliver value.
How Anomaly Mastery Scales
Unlike many secondary stats with diminishing returns, Anomaly Mastery follows a clear, predictable linear scaling model—making it one of the most reliable damage-enhancing attributes for anomaly-focused agents. Understanding these rules is essential before deciding how heavily to invest.
Damage Scaling Rules
At its core, Anomaly Mastery directly increases the damage dealt by abnormal statuses. The practical scaling rules are as follows:
Every 10 points of Anomaly Mastery=5% increase to abnormal damage
300 Anomaly Mastery=Over 150% total abnormal damage bonus
This bonus applies not only to the initial application of abnormal statuses but also to secondary/follow-up effects. As a result, Anomaly Mastery provides consistent value throughout the entire damage cycle, not just at trigger moments.
Control & Status Enhancement
Beyond raw damage, Anomaly Mastery also strengthens the functional control effects of abnormal statuses—greatly impacting combat flow and team safety:
Extends the paralysis duration caused by Shock
Increases the tick frequency of Burn damage (higher sustained output)
Prolongs the crowd-control window of Freeze (safer DPS windows)
When sufficiently stacked, these enhancements can effectively lock down enemies for extended periods—an invaluable advantage in high-difficulty encounters like Expert Challenge or limited-time event dungeons.
Improvement Methods
To maximize Anomaly Mastery’s value, optimization should follow a clear order: agent progression → equipment/emblems → team synergy. Below is a detailed breakdown of the most efficient methods.
Agent Progression Priority
Agent development is the foundation of Anomaly Mastery—focus on anomaly-oriented agents to ensure investments pay off:
Prioritize leveling and promoting anomaly-type agents (e.g., Anomaly-specialized S/A-Rank agents)
Unlock talents that provide direct Anomaly Mastery bonuses (core for baseline stats)
Focus on agents whose core mechanics revolve around abnormal statuses (ensures Mastery investments are not wasted)
With full promotion and talent investment, anomaly-focused agents can exceed 150 base Anomaly Mastery before equipment bonuses—forming a solid foundation for further optimization.
Recommended Emblems
Emblems offer some of the most impactful Anomaly Mastery boosts and should be selected to align with your agent’s focus:
Abnormality Amplifier: Direct, reliable increase to Anomaly Mastery (universal choice for all anomaly agents)
Elemental Resonance: Additional Mastery tied to specific elements (ideal for mono-element anomaly squads, e.g., Ice/Freeze or Lightning/Shock)
Equipment Priorities
Equipment should reinforce your anomaly focus to maximize Anomaly Mastery’s effectiveness:
Main stat priority: Anomaly Mastery (core for primary equipment slots)
Sub-stat priority: Anomaly Mastery → Anomaly Buildup (balance ensures consistent triggers + strong effects)
Additionally, certain support agents provide temporary team-wide Anomaly Mastery buffs. Timing these buffs with anomaly triggers or burst windows can significantly amplify overall damage efficiency.
Anomaly Buildup & Combat Synergy
Anomaly Mastery cannot reach its full potential in isolation—Anomaly Buildup is the critical “partner” that triggers the abnormal statuses Mastery enhances. Below is how to balance the two and build synergistic squads.
How Anomaly Buildup Works
Anomaly Buildup is the rate at which abnormal values accumulate on enemies via attacks. Once the value hits a specific threshold, the corresponding abnormal status is triggered. Different anomaly types have distinct buildup speeds:
Shock: Fast buildup → frequent paralysis (ideal for crowd control)

Burn: Moderate buildup → sustained damage (great for multi-target encounters)

Freeze: Slow buildup → strong control (excellent for single-target boss fights)

Understanding these differences is crucial for selecting agents and planning team rotations.
Best Anomaly Synergy Examples
Effective anomaly squads rely on focused synergy, not excessive variety. Here are the most practical combinations:
Shock + Burn: Combines frequent paralysis (Shock) with continuous tick damage (Burn) → ideal for multi-target encounters (e.g., Void Raid waves)
Freeze + Shatter: Extends single-target control (Freeze) followed by high burst damage (Shatter) → perfect for boss fights (e.g., Agent’s Ultimate Trial)
Avoid spreading too many anomaly types in one team—this dilutes buildup efficiency, delays triggers, and reduces damage consistency.
Common Mistakes
Even with strong attributes and equipment, improper allocation can waste Anomaly Mastery’s potential. Below are common pitfalls and how to avoid them:
|
Category |
Details |
|
Common Pitfalls |
1. Stacking Anomaly Mastery without sufficient Buildup: Results in slow, inconsistent status triggers (Mastery has no effect if statuses never activate) |
|
2. Prioritizing Mastery on non-anomaly agents: Wastes resources—only agents with anomaly-focused kits benefit significantly |
|
|
3. Ignoring enemy abnormal resistance: High-resistance enemies reduce Mastery’s effectiveness—adjust team comps for these encounters |
|
|
Optimization Tip |
Maintain a 2:1 ratio of Anomaly Buildup to Mastery. This balance ensures consistent status triggers while still providing meaningful damage amplification—critical for stable performance across all game modes. |
FAQ
Q: Is Anomaly Mastery effective against bosses?
A: Yes, but bosses have higher anomaly thresholds. You’ll need both high Buildup (to trigger statuses) and high Mastery (to amplify effects) for optimal results.
Q: Do all agents need Anomaly Mastery?
A: No. Only anomaly-focused agents (e.g., those who rely on Shock/Burn/Freeze for damage/control) benefit significantly. Attack or Defence agents with no anomaly synergy should prioritize other stats (ATK, CRIT, Max HP).
Q: What’s the best way to balance Anomaly Mastery and Buildup?
A: Focus on Buildup first to ensure consistent status triggers (aim for enough to trigger statuses 2-3 times per rotation), then invest in Mastery to amplify effects. The 2:1 ratio (Buildup: Mastery) is a reliable baseline.
Conclusion
Mastering Anomaly Mastery is essential for maximizing abnormal damage and control in Zenless Zone Zero. By understanding its linear scaling, balancing it with Anomaly Buildup, optimizing agent progression/equipment, and building synergistic squads, you can significantly boost combat efficiency across all game modes—from daily dungeons to high-difficulty Expert Challenges.
Whether you’re unlocking core anomaly-type agents, obtaining emblems, or farming enhancement materials, ZZZ top-up is a perfect choice for Zenless Zone Zero players looking to optimize their anomaly squads quickly.


